| Map stub |
|---|
| This article is a stub. You can help the Unreal Wiki by expanding it. What needs to be done: Improve the Description and Objective sections by using the Mission template; add weapon/item/vehicle info. |

"This scenario is based on an infamous episode of a popular Holovision program. In the original episode, two teams of mechanics were competing to make their vehicle operational and escape the junk yard. The unexpected twist occurred when the losing team pulled out some makeshift weapons and pounded the other team into oblivion before they could make their escape. Since there was no explicit rule forbidding violence in the competition, they were declared the winners, and a new Tournament classic was born."
– Map description
Map Description
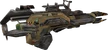
In this map the attacking team must "build" a Hellbender and race it to the exit of the junkyard. There are a few obstacles along the way, with spawnpoints of the defending team nearby. It is their job to delay the attackers as much as they can (by destroying the Hellbender or preventing the other team from clearing the road to the exit). After one of the obstacles has been cleared, a checkpoint becomes available for the attacking team. The team with the fastest time wins.
This map can be considered an updated and reimagined AS-Rook.
Objectives
- Find the Energy Core
- Before the attackers can use the Hellbender, they first must make it operational. For that, they need the core. There is a large clearing outside the attacker's base, with a large metal structure in the middle. The core is located on a platform inside that structure.
- The spawnpoints of the defending team are very close, so they'll be waiting for the attackers near the core. The defending team also has a turret on a high ledge to the right which overlooks the entire battlefield. This turret can be reached quickly with the network of jumppads.
- Return the Core to the Vehicle
- Pick up the core (by walking over it) and take it back to the base. When the person carrying the core dies, the core will be dropped and someone else from the attacking team can pick it up again. When the core is carried into the base the Hellbender is operational.
- The defenders will have a Sniper Rifle, which can be very effective in this battle. If the turret hasn't been taken out yet, then that too still forms a threat to the attackers.
- Lower the Bridge
- Right above the attacker's base is a bridge. The problem, however, is that the bridge is open, blocking the Hellbender. It's only a small distance from the base though, and a player on foot will be there in no-time. When walking out of the base, go left (uphill), through the bars and you'll find the switch to lower the bridge on the other side of the road.
- The defending team has another turret on the sight, which can be really useful for taking down the enemy before they can reach the switch. Its view on the switch itself is slightly obstructed by a fence and the structure of the bridge. A crouched player near the switch can not be shot by the turret. 2 additional healthpack next to the turret should help the defenders survive a little longer.
- Cross the Bridge
- Once the bridge is lowered you will have to get the Hellbender across. There are 2 splits in the road from the base to the bridge. The left road is the shortest (both times). It's also the least safe one, as another turret overlooks that road. You'll also have to jump over a fire pit after the 2nd split which may cause up to 200 damage to the Hellbender. Make it to the end of the bridge (and onto the white platform) for the checkpoint. Your Hellbender will now respawn here instead of back at the base.
- The defenders have 3 turrets to use: the one that was mentioned just now, the one from the previous objective, and the one from the first 2 objectives. The Hellbender can be followed on foot by using the jumppads, so an offense of players on foot can be effective as well.
- Open the Checkpoint Gate
- Just like the 3rd Objective: this is one for the players on foot. After having opened the bridge, go in the direction opposite of the bridge. To the right of the turret you'll see a jumppad leading up. Take that one and take the road on the left to the switch.
- Defenses here are heavy and include another turret which can look over the road to the switch, making a lone player an easy target. The defending team has a big loadout of weapons as usual, including the Sniper Rifle. Their primary focus should be to guard the road leading to the front gate. A useful Mine Layer can be found near the checkpoint as well.
- Secure the Checkpoint
- After you've crossed the bridge in the Hellbender you'll get to a crossing. Go right to go to the next checkpoint. The left road leads to the magnet, which will be discussed later on. After the turn you'll find a more sheltered road on the right. Although it does provide coverage, a number of explosive barrels on the end of it will slightly compensate that advantage. Right after that tunnel the player can once again choose 2 paths: The path on the left is longer, but also much safer. It's also where the Redeemer is located. The path on the right is shorter, but not nearly as safe. After the 2 roads join again it's a straight piece to the checkpoint.
- For the first time the defending team does not have a turret in the area. It may look like this area is hard to defend, but it's not. Shooting the barrels next to the group of pipes will cause the pipes to roll free and block most of that route. The "tunnel" will be the Hellbender's only option, making it easy to attack. The route through the drive-in cinema is the defending team's only concern. The other passage has a button which activates a set of crushers, causing everything inside the passage to be wrecked/killed.
- Proceed to the Main Gates
- All there is left now is a last run to the Main Gate. Along the way you'll find enemy turrets and exploding barrels. Neither should be a problem if you drive fast and keep your eye on the road. Near the end the road splits one more time. The left road is slightly quicker due to the less steep terrain. The difference is small though. After that you should see a flashing tunnel which means you've made it!
- Along the road the defending team has 2 more turrets. The first one isn't really interesting unless you plan on attacking the Hellbender early on. The 2nd turret (which near the end) is more interesting for the defenders, as the Mine Layer is in the weapon loadout there. A hill with the turret on there splits the road in 2. Shooting the explosive barrels near the big antenna will cause it to fall over, blocking 1 of the 2 paths, making it lots easier to defend the area. The jumppads make it easy to go from 1 turret to the other (even faster than the Hellbender will) so players can attack the vehicle on both defense points.
Weapons & Pickups
Weapons
| Weapon | Count | Location |
|---|---|---|
W : 1 |
Weapon: On a piece of scrap near the magnet. | |
W : 1 |
Weapon: Near the house in the drive-in cinema. |

Pickups
| Pickup | Count | Location |
|---|
Vehicles and turrets
- 1x Hellbender
Tips & tricks
- Offensive
- As mentioned before: the left road right after the bridge leads to a magnet. This magnet picks up the Hellbender and carries it across the level, out in the open. When the Hellbender is dropped the 5th and 6th Objectives will be completed and you can continue to go on to the Main Gates. When used successfully, the magnet will give the player a quicker route to the end. However, the Hellbender will be very vulnerable to attack, as it can be seen and fired at from most of the level.
- Another thing that might help the attackers is to spread out, especially when working in larger teams. 1 person can just go ahead to the switch for the next objective, before the defending team builds up its defense, and wait for the rest of the team to complete the objective before that.
- Defensive
- The defending team can make use of all kinds of features in this map. Blow up the barrels near the pipes and the big antenna at the end to block some passages and make the job easier. Lay down mine fields and have the Redeemer ready for when it's needed. The best spot to choke the Hellbender is the tunnel near the pipes, as it has to drive through this narrow, long cylinder, making it vulnerable to mine fields and other firepower. When the attackers use the magnet, then the Redeemer is the best option. Other options are turrets (there are 2 with a constant clear view on the magnet) and the AVRiL.
Trivia
- The map is likely a reference to the Scrapheap Challenge TV show, known as Junkyard Wars in the US, where contestants need to build a working machine using junkyard items.
- Many believe the map references the Goatse shock site with the tunnel at the end of the map (with the pipes at the sides resembling the hands).
- There is a hidden bathtub near where the road from the magnet to the main gate and the road from the final checkpoint to the main gate join. This bathtub, with a fountain of brown goo coming from the drain could be a reference to Tubgirl, another famous shock site.
- Bot support for this map is notoriously buggy. When defending if you kill a bot holding the power core no other bot will pick it up, even after it returns to the respawn point. Also, the bots will never take the magnet route, which means that they'll always use the same route over and over again.
Gallery
")
Unreal Tournament 2004 "Godlike" maxed graphics 4K 2160p Walkthrough PART 38 - Junkyard Escape
Godlike gameplay.
External links and references
See also
| Assault maps for Unreal Tournament 2004 |
|---|
| Mega Pack maps: |