Map description[]
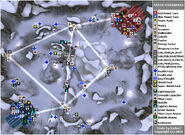
As the name gives away, this map is set in a small snowy valley with a dense blue fog. It's a bit of a compact Onslaught map with plenty of z-axis gameplay because of the many rocks and cliffs. The map is slightly asymmetrical, but the bases are built exactly the same. There's a bridge in the very center of the map, acting as the choke point of it. The Red Base is located at the Northeast corner of the map, while the Blue Base is located in the Southwest corner.
The following named areas are featured in the map:
- Outside: The main playing area, holds all the nodes.
- Red Base: Located at the northeast of the map.
- Blue Base: Locates at the southwest of the map.
- North Node: The area holding the Red Prime Node.
- East Node: The area holding the East Node.
- Central Node: The area holding the Central Node.
- South Node: The area holding the Blue Prime Node.
- West Node: The area holding the West Node.
- Bridge: The bridge above the Central Node.
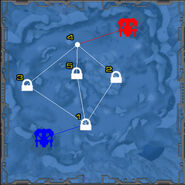
There are five nodes in this map:
- Node 1 is the Blue Prime Node, located in a road at the east of the Blue Base.
- Node 2 is the East Node, located in the middle of the map, at the south of the Red Base.
- Node 3 is the West Node, also located in the middle of the map, but at the north of the Blue Base.
- Node 4 is the Red Prime Node, located in a road at the west of the Red Base.
- Node 5 is the Center Node, located below the central bridge of the map.
Both the Blue Prime and Red Prime nodes are located in roads near their respective bases. These nodes house an Energy Turret, a Manta and a Scorpion each.
Continuing from the Red or Blue Prime node going upwards to the west, at the top of a risc, players will find the West node. From these same nodes, but circling the snow mountain at the center-east part of the map, players can find the East node. These nodes house each an Energy Turret, a Manta and a Hellbender.
Finally, going to the center from the Blue Prime and Red Prime nodes, players will find a bridge. Below it there's the Center Node, which holds the biggest cache of the map with four energy turrets, a Raptor, a Goliath and a Scorpion.
Link Setups[]
- Default: Both Cores connected to their respective Prime nodes. Both Prime nodes connected to the West, Center and East nodes.
- Choke Point: Both Cores connected to their respective Prime nodes. The Blue Core is also connected to the West Node, while the Red Core is connected to the East Node. Both Primes and the West and East Nodes are connected to the Center Node. This setup avoids the dreaded "Enemy prime stalemate" situation, but makes the Center Node the bottleneck of the map.
Weapons and pickups[]
Weapons[]
| Weapon | Count | Location |
|---|---|---|
W : 2 A : 4 |
Weapon: 1x Red Base, western entrance. 1x Blue Base, eastern entrance. Ammo: 2x Near the Red Base weapon. 2x Near the Blue Base weapon. | |
W : 4 A : 4 |
Weapon: 1x Crossroads between the road to the Bridge, the Central Area, and the Blue Base. 1x Near the crossroads from the East Node, the Blue Prime Node and the Central Area. 1x Red Base, below the ramp to upper level. 1x Blue Base, below the ramp to upper level. Ammo: 2x Near the Blue Base weapon. 2x Near the Red Base weapon. | |
W : 2 A : 2 |
Weapon: 1x Lamp near the Blue Base. 1x Energy Turret guarding the Red Base. Ammo: 1x Near the Blue Base Lamp weapon. | |
W : 4 A : 9 |
Weapon: 1x Near a turret looking at Central Area on the Blue side. 1x Bridge area, behind a bunker. 1x Near a turret near the Blue base. 1x Blue Base, eastern entrance. 1x Red Base, western entrance. Ammo: 2x Near the Blue turret weapon. 2x Near the Bridge area weapon. 1x Near the Blue Base turret weapon. 2x Near the Blue Base weapon. 2x Near the Red Base weapon. | |
W : 1 |
Weapon: 1x Central Area, at a ledge accessible by falling from the bridge or by a nearby jumppad. |
Weapon Lockers[]
| Items | Count | Location |
|---|---|---|
| 4 | 1x Blue base, upper level. 1x Blue base, lower level. 1x Red base, upper level. 1x Red base, lower level. | |
| 2 | 1x Near the West Node. 1x Near the East Node. | |
| 2 | 1x Near the Red Prime Node. 1x Near the Blue Prime Node. | |
| 1 | 1x Central Area, near the Center Node. |
Pickups[]
| Pickup | Count | Location |
|---|---|---|
12 |
6x Blue Base, near the Power Core. 6x Red Base, near the Power Core. | |
15 |
1x Lamp near the Blue Base. 1x Facing the Central Area from the end of a road to the Blue Base. 1x Upper road between Red Prime Node and West Node. 1x Crossroads between the road to the Bridge, the Central Area, and the Blue Base. 1x Western road to Central Area. 1x Central Area. 1x Upper road from Blue Prime Node to East Node. 1x Near the Blue Prime Node turret. 1x Blue Base, upper level, western entrance, behind the big pipe. 1x Red Base, upper level, eastern entrance, behind the big pipe. 1x Western road to the Central Node from Blue Base. 1x Near the Blue Base outside turret. 1x Red Base, lower level, eastern entrance. 1x Upper road to East Node. 1x Near the Red Base turret. | |
1 |
1x Southeast crossroads between the road to the Central Area and the roads to the East Node and the Red Base. | |
4 |
1x Red Base, lower level, eastern entrance. 1x Blue Base, lower level, western entrance. 1x Central Area. 1x Upper road between Red Prime Node and West Node. | |
1 |
1x Near the Blue Prime Node. |
Vehicles[]
| Vehicle | Count | Location |
|---|---|---|
9 |
1x Central Area. 1x East Node. 1x West Node. 1x Red Prime Node Node. 1x Blue Prime Node. 1x Blue Base, lower level, western entrance. 1x Red Base, lower level, western entrance. 1x Blue Base, lower level, eastern entrance. 1x Red Base, lower level, eastern entrance. | |
3 |
1x Central Area. 1x Red Base, upper level, eastern entrance. 1x Blue Base, upper level, western entrance. | |
5 |
1x Central Area. 1x Red Base, lower level, western entrance. 1x Blue Base, lower level, eastern entrance. 1x Red Prime Node. 1x Blue Prime Node. | |
4 |
1x East Node. 1x Blue Base, lower level, western entrance. 1x West Node. 1x Red Base, lower level, western entrance. | |
3 |
1x Red Base, lower level. 1x Blue Base, lower level. 1x Bridge Area. | |
18 |
1x Red Base, upper level, eastern entrance. 1x Blue Base, upper level, western entrance. 1x Red Base, lower level, eastern entrance. 1x Blue Base, lower level, western entrance. 1x Red Base, upper level, eastern entrance. 1x Blue Base, upper level, western entrance. 1x Red Base, lower level, eastern entrance. 1x Blue Base, lower level, western entrance. 4x Bridge area, two at each extreme of the bridge. 1x Near the Red Prime Node, facing the Central Area. 1x Near the East Node. 1x Near the Red Prime Node, facing at the node. 1x Facing the Central Area from the end of a road to the Blue Base. 1x Near the Blue Base. 1x Near the Red Base. |
Tips and tricks[]
- The locations of both the Keg O' Health and the Super Shield gives the team starting at the Blue Base an advantage.
Offense[]
The open layout of the field is excellent for sniper support when raiding nodes. Shock Rifles and Sniper Rifles can be great tools for distant takeouts, and even keep damage on the node to prevent reinforcements from spawning. Use the cliffs via Raptors, Manta jumps, or the Low-Grav/Quad Jump modifiers to your advantage in gaining a better nest.
Having trouble with a node? Due to the triple-path of the default layout, you can easily cut off one of the lateral or center nodes by attacking the node next to their base.
Defense[]
Because of the openness and many paths to nodes, defense is incredibly difficult. Be sure to defend from the intersections that lead to a node, so that you are fighting the opponent before he can even attack the node itself. This is especial to the node next to the opponent's base, as the opponent has the advantage of close-spawning firepower.
Be sure to defend the bridge. Not only is the node important in the Choke Point layout, but it is also a major path going base to base for the vehicles. Be wary of drop raids from Mantas, and infantry when Low-Grav/Quad Jump make long falls an easy feat.
Link setup-specific tips[]
- Choke Point: The Central Node becomes a key point in this setup, so the obvious tip is to defend it at all costs once you have powered it. If you started at the Red Base, though, focus on getting the Blue Prime controlled, as the Blue Base team has both goodies.
Trivia[]
- Until the stats for the game were shut down, the map held the distinction of being the 26th. most played UT2004 map of all-time, with nearly 96.000 matches.[1]
Gallery[]
External links and references[]
- ↑ "Unreal Tournament 2004 Map stats" @ ut2004stats
See also[]
| Onslaught maps for Unreal Tournament 2004 |
|---|
| XP Bonus Maps: |
| ECE Bonus Pack maps: |


